
")
Heading out on a camping trip and wondering how to make dessert outdoors? Dutch oven desserts are a delightful solution that combine the thrill of off-grid living with mouthwatering sweet treats.
In this blog post, we’ll share easy-to-make, irresistible Dutch Oven Dessert recipes you can whip up on your next camping adventure. So why wait? Dive right in and prepare to tantalize your taste buds under the stars!
Key Takeaways
- Dutch oven desserts are the perfect way to enjoy delicious sweet treats while camping.
- There are a variety of classic, creative, and quick recipes to choose from that will satisfy any sweet tooth.
- These desserts can be easily made in a Dutch oven over a campfire, making them ideal for off – grid living and outdoor adventures.
- From peach cobblers to s’mores cakes, there is a Dutch oven dessert recipe for every camper’s taste preference.
Classic Dutch Oven Dessert Recipes
Indulge in these mouthwatering classic Dutch oven dessert recipes that are perfect for camping.
Dutch Oven Peach Cobbler
A Dutch Oven Peach Cobbler is an ideal dessert to enjoy while camping. Bubbling with sweet, juicy peaches and a buttery golden crust, this recipe brings together the comfort of home and the joy of outdoor cooking effortlessly.
As one of our essential dishes in this collection, it promises to impress your fellow campers on every adventure. The best part is its simplicity – fresh or canned peaches work equally well! A scoop of vanilla ice cream on top can add extra delight for those who crave a sweeter experience.
This dish allows you to indulge in a snugly warm peach dessert under the wide-open sky—perfect for creating shared moments around the campfire!
Upside Down Pineapple Cake
Ingredients for Pineapple Layer:
- 1/4 cup unsalted butter
- 3/4 cup brown sugar
- 1 can (20 oz) pineapple slices, drained (reserve the juice)
- Maraschino cherries (optional)
Ingredients for Cake Batter:
- 1 1/2 cups all-purpose flour
- 1 1/2 teaspoons baking powder
- 1/4 teaspoon salt
- 1/2 cup unsalted butter, softened
- 1 cup granulated sugar
- 2 large eggs
- 1 teaspoon vanilla extract
- 1/2 cup pineapple juice (reserved from the can)
Instructions:
- Start by preparing your Dutch oven. Melt 1/4 cup of butter in the Dutch oven over low heat. Once melted, remove the Dutch oven from heat.
- Sprinkle the brown sugar evenly over the melted butter in the Dutch oven.
- Arrange the pineapple slices on top of the brown sugar. If desired, place maraschino cherries in the center of the pineapple rings and in any gaps.
- In a separate bowl, whisk together the flour, baking powder, and salt for the cake batter.
- In another mixing bowl, cream together the softened butter and granulated sugar until light and fluffy.
- Add the eggs one at a time, mixing well after each addition. Then, mix in the vanilla extract.
- Gradually add the dry ingredients to the wet ingredients, alternating with the pineapple juice. Mix until the batter is smooth.
- Carefully spread the cake batter over the pineapple layer in the Dutch oven.
- Place the Dutch oven over low heat and cover it with the lid.
- Bake on low heat for about 40-50 minutes or until a toothpick inserted into the center of the cake comes out clean.
- Once the cake is done, remove the Dutch oven from heat and let it cool for a few minutes.
- Run a knife around the edges of the cake to loosen it from the Dutch oven.
- Place a serving platter over the Dutch oven and quickly and carefully invert the cake onto the platter. The pineapple layer should now be on top.
- Allow the cake to cool slightly before serving. Serve warm or at room temperature.
This Upside-Down Pineapple Cake is a delightful treat that can be made using your Dutch oven. The caramelized pineapple and brown sugar layer on top creates a deliciously sweet and moist cake. Enjoy!
Mississippi Mud Cake
Ingredients for Cake:
- 1 cup unsalted butter
- 1/2 cup cocoa powder
- 2 cups granulated sugar
- 4 large eggs
- 1 teaspoon vanilla extract
- 1 1/2 cups all-purpose flour
- 1/2 teaspoon salt
- 1 1/2 cups chopped pecans or walnuts (optional)
Ingredients for Marshmallow Layer:
- 4 cups mini marshmallows
Ingredients for Chocolate Frosting:
- 1/2 cup unsalted butter
- 1/4 cup cocoa powder
- 1/4 cup milk
- 3 cups powdered sugar
- 1 teaspoon vanilla extract
Instructions:
- Start by preparing your Dutch oven. Preheat your oven to 350°F (175°C). Grease the inside of the Dutch oven or line it with parchment paper.
- In a medium saucepan, melt the butter over low heat. Once melted, stir in the cocoa powder until well combined. Remove from heat.
- In a separate mixing bowl, whisk together the granulated sugar, eggs, and vanilla extract until smooth.
- Gradually add the cocoa-butter mixture to the egg mixture, stirring until well combined.
- In another bowl, mix the flour and salt. Gradually add this dry mixture to the wet mixture, stirring until just combined.
- If using nuts, fold in the chopped pecans or walnuts into the batter.
- Pour the batter into the prepared Dutch oven and spread it evenly.
- Bake the cake in the preheated oven for about 25-30 minutes, or until a toothpick inserted into the center comes out with a few moist crumbs.
- Once the cake is done, remove it from the oven and immediately sprinkle the mini marshmallows over the top of the cake.
- Return the Dutch oven to the oven for an additional 5 minutes, or until the marshmallows are puffed and slightly golden.
- While the cake is cooling slightly, prepare the chocolate frosting. In a saucepan, melt the butter over low heat. Stir in the cocoa powder and milk until smooth. Remove from heat.
- Gradually whisk in the powdered sugar and vanilla extract until the frosting is smooth and well combined.
- Pour the chocolate frosting over the marshmallow layer, spreading it evenly.
- Allow the cake to cool for a bit before serving. The frosting will set as the cake cools.
- Slice and serve the Mississippi Mud Cake from the Dutch oven. It’s best enjoyed warm or at room temperature.
This Mississippi Mud Cake is rich, decadent, and loaded with gooey marshmallows and chocolatey goodness. Your Dutch oven will help create a perfect cake for indulging in this delightful treat. Enjoy!
Giant Cinnamon Roll
The Giant Cinnamon Roll is a must-try Dutch oven dessert for camping. It’s a delicious treat that will satisfy your sweet tooth and impress your fellow campers. Made with layers of fluffy dough, cinnamon sugar, and a gooey glaze, this oversized pastry is perfect for sharing around the campfire.
Ingredients for the Dough:
- 4 cups all-purpose flour
- 1/4 cup granulated sugar
- 1 package (1/4 oz) active dry yeast
- 1 teaspoon salt
- 1 cup milk
- 1/4 cup unsalted butter
- 2 large eggs
Ingredients for the Filling:
- 1/2 cup unsalted butter, softened
- 3/4 cup brown sugar
- 2 tablespoons ground cinnamon
Ingredients for the Cream Cheese Glaze:
- 4 oz cream cheese, softened
- 1/4 cup unsalted butter, softened
- 1 cup powdered sugar
- 1 teaspoon vanilla extract
- 2-3 tablespoons milk
Instructions:
- Start by preparing your Dutch oven. Grease the inside of the Dutch oven well.
- In a mixing bowl, combine 2 cups of flour, granulated sugar, yeast, and salt.
- In a saucepan, heat the milk and butter over low heat until the butter is melted and the mixture is warm (about 110°F or 45°C).
- Add the warm milk mixture to the dry ingredients and mix until well combined.
- Beat in the eggs one at a time, then gradually add the remaining flour until a soft dough forms.
- Turn the dough out onto a floured surface and knead it for about 5-7 minutes, until it becomes smooth and elastic.
- Roll out the dough into a large rectangle, about 1/4 inch thick.
- Spread the softened butter over the dough, leaving a small border around the edges.
- Mix together the brown sugar and ground cinnamon, then sprinkle it evenly over the buttered dough.
- Starting from one long edge, roll up the dough tightly into a log.
- Carefully cut the rolled dough into slices about 2 inches thick.
- Place the slices in the greased Dutch oven, arranging them close together.
- Cover the Dutch oven with a lid or plastic wrap and let the rolls rise in a warm place for about 30-45 minutes, until they have doubled in size.
- Preheat your Dutch oven on a stovetop on low heat for a few minutes.
- Place the Dutch oven with the risen rolls in the preheated oven. Bake at 350°F (175°C) for about 20-25 minutes or until the rolls are golden brown and cooked through.
- While the rolls are baking, prepare the cream cheese glaze. In a bowl, beat together the softened cream cheese, butter, powdered sugar, vanilla extract, and milk until smooth and creamy.
- Once the rolls are done, remove the Dutch oven from the oven and let the rolls cool slightly.
- Drizzle the cream cheese glaze over the warm giant cinnamon roll.
- Slice and serve the giant cinnamon roll directly from the Dutch oven. Enjoy the warm, gooey goodness!
This Giant Cinnamon Roll is a delightful treat that’s perfect for sharing with friends and family. The Dutch oven will help you achieve a soft, pillowy roll with a delicious cinnamon filling and creamy glaze.
Texas Peach Cobbler
The Texas Peach Cobbler is a mouthwatering dutch oven dessert that is perfect for your camping adventures. Made with fresh peaches and a golden buttery crust, this cobbler will satisfy any sweet tooth.
Ingredients for the Peach Filling:
- 6 cups fresh or frozen peaches, peeled, pitted, and sliced
- 1 cup granulated sugar
- 1/4 teaspoon cinnamon
- 1/4 teaspoon nutmeg
- 2 tablespoons lemon juice
- 2 tablespoons cornstarch
Ingredients for the Cobbler Topping:
- 1 cup all-purpose flour
- 1/2 cup granulated sugar
- 1 teaspoon baking powder
- 1/2 teaspoon salt
- 1/2 cup milk
- 1/4 cup unsalted butter, melted
Instructions:
- Start by preparing your Dutch oven. Preheat your oven to 350°F (175°C).
- In a mixing bowl, combine the sliced peaches, granulated sugar, cinnamon, nutmeg, lemon juice, and cornstarch. Stir well to coat the peaches evenly. Let the mixture sit while you prepare the cobbler topping.
- In another bowl, whisk together the flour, granulated sugar, baking powder, and salt for the cobbler topping.
- Pour in the milk and melted butter, and stir until just combined. The batter will be slightly lumpy.
- Place the Dutch oven over low heat on the stovetop for a few minutes to warm it up.
- Pour the peach filling into the preheated Dutch oven.
- Using a spoon, drop spoonfuls of the cobbler batter on top of the peach filling. Don’t worry about spreading it out evenly; it will spread as it bakes.
- Cover the Dutch oven with its lid and carefully transfer it to the preheated oven.
- Bake the cobbler for about 40-45 minutes, or until the topping is golden brown and the peach filling is bubbling.
- Once the cobbler is done, remove it from the oven and let it cool slightly before serving.
- Serve the Texas Peach Cobbler warm, either on its own or with a scoop of vanilla ice cream.
This Texas-style Peach Cobbler is a wonderful dessert that combines juicy peaches with a sweet, tender cobbler topping. Your Dutch oven will help create a beautifully baked cobbler with that classic homemade taste. Enjoy the comfort of this delicious dessert!
Dutch Oven S’mores Cake
The Dutch Oven S’mores Cake is a delectable camping dessert that combines the gooey goodness of s’mores with the rich flavors of cake. Made with layers of chocolate cake, marshmallows, and graham crackers, this recipe is a crowd favorite.
Ingredients:
- 1 1/2 cups all-purpose flour
- 1 cup graham cracker crumbs
- 1 cup granulated sugar
- 1/2 cup unsalted butter, melted
- 1 cup milk
- 2 large eggs
- 2 teaspoons baking powder
- 1/2 teaspoon salt
- 1 teaspoon vanilla extract
For the Filling and Topping:
- 1 cup chocolate chips
- 2 cups mini marshmallows
- Crushed graham crackers for garnish
Instructions:
- Start by preparing your Dutch oven. Grease the inside well to prevent sticking.
- In a mixing bowl, combine the all-purpose flour, graham cracker crumbs, granulated sugar, baking powder, and salt.
- In a separate bowl, whisk together the melted butter, milk, eggs, and vanilla extract until well combined.
- Gradually add the wet ingredients to the dry ingredients, mixing until just combined. Be careful not to overmix; a few lumps are okay.
- Pour half of the batter into the greased Dutch oven.
- Sprinkle the chocolate chips evenly over the batter.
- Add the remaining batter over the chocolate chips, spreading it gently to cover.
- Cover the Dutch oven with its lid.
- If you’re using a Dutch oven outdoors, prepare a campfire or charcoal briquettes. Place some coals on the ground and set the Dutch oven over them. Place additional coals on the lid to create an even baking temperature.
- If you’re using a Dutch oven indoors, preheat your oven to 350°F (175°C) and place the covered Dutch oven in the oven.
- Bake the cake for about 25-30 minutes or until a toothpick inserted into the center comes out clean.
- Carefully remove the Dutch oven from the heat source or oven.
- Remove the lid and sprinkle the mini marshmallows over the top of the cake.
- If you’re using a campfire or charcoal setup, place the Dutch oven back on the heat source for a few minutes until the marshmallows are toasted and golden brown.
- If you’re baking indoors, you can use a kitchen torch to gently toast the marshmallows until they’re golden brown.
- Sprinkle crushed graham crackers over the toasted marshmallows for garnish.
- Allow the cake to cool slightly before serving. Serve warm for the best gooey and chocolatey experience.
This Dutch Oven S’mores Cake is a delightful twist on the classic campfire treat. The Dutch oven helps create a moist and flavorful cake with gooey chocolate and toasted marshmallow layers that will remind you of traditional s’mores. Enjoy this delicious dessert whether you’re outdoors or indoors!
Creative and Unique Dutch Oven Dessert Recipes
Indulge your taste buds with these creative and unique Dutch oven dessert recipes.
Lemon Blueberry Biscuits
Lemon blueberry biscuits are a refreshing and tangy twist on traditional campfire desserts. These fluffy biscuits are bursting with the flavors of zesty lemon and juicy blueberries, making them the perfect treat for summertime camping adventures.
Ingredients:
For the Biscuits:
- 2 cups all-purpose flour
- 1/4 cup granulated sugar
- 1 tablespoon baking powder
- 1/2 teaspoon salt
- Zest of 1 lemon
- 1/2 cup unsalted butter, cold and cubed
- 1 cup fresh blueberries
- 3/4 cup buttermilk
For the Lemon Glaze:
- 1 cup powdered sugar
- 2 tablespoons fresh lemon juice
- Zest of 1 lemon
Instructions:
- Start by preparing your Dutch oven. Preheat your oven to 400°F (200°C) and grease the inside of the Dutch oven.
- In a mixing bowl, whisk together the all-purpose flour, granulated sugar, baking powder, salt, and lemon zest.
- Add the cold, cubed butter to the dry ingredients. Use a pastry cutter or your fingers to work the butter into the flour mixture until it resembles coarse crumbs.
- Gently fold in the fresh blueberries.
- Make a well in the center of the mixture and pour in the buttermilk. Use a fork to mix the buttermilk into the dry ingredients until just combined. Do not overmix; the dough should be slightly sticky.
- Turn the dough out onto a floured surface and gently knead it a few times until it comes together.
- Pat the dough into a circle about 1 inch thick.
- Use a round biscuit cutter or a drinking glass to cut out biscuits from the dough. Dip the cutter in flour before each cut to prevent sticking.
- Place the cut biscuits in the greased Dutch oven, arranging them close together.
- If you’re using a Dutch oven with a lid, cover it with the lid.
- Bake the biscuits in the preheated oven for about 18-20 minutes, or until they are golden brown on top.
- While the biscuits are baking, prepare the lemon glaze. In a bowl, whisk together the powdered sugar, fresh lemon juice, and lemon zest until smooth.
- Once the biscuits are done, remove the Dutch oven from the oven and let the biscuits cool slightly.
- Drizzle the lemon glaze over the warm biscuits.
- Serve the Lemon Blueberry Biscuits directly from the Dutch oven while they’re still warm.
These Lemon Blueberry Biscuits are a delightful combination of tangy lemon zest, sweet blueberries, and tender biscuit texture. Your Dutch oven will help you achieve perfectly baked biscuits with a lovely golden crust. Enjoy them as a delicious breakfast or snack!
Chocolate Cherry Lava Cake
Chocolate Cherry Lava Cake is a decadent and indulgent dessert that’s perfect for camping. The rich chocolate cake oozes with a gooey cherry filling, creating a delightful surprise when you take your first bite.
Ingredients:
- 1/2 cup unsalted butter
- 1 cup semi-sweet chocolate chips
- 1 cup powdered sugar
- 2 large eggs
- 2 egg yolks
- 1 teaspoon vanilla extract
- 1/2 cup all-purpose flour
- 1/4 teaspoon salt
- 1/2 cup cherries, pitted and chopped (fresh or frozen)
- Powdered sugar for dusting (optional)
- Vanilla ice cream for serving (optional)
Instructions:
- Start by preparing your Dutch oven. Grease the inside of the Dutch oven well.
- In a microwave-safe bowl or using a double boiler, melt the butter and chocolate chips together, stirring until smooth. Allow the mixture to cool slightly.
- In a separate bowl, whisk together the powdered sugar, eggs, egg yolks, and vanilla extract until well combined.
- Gradually add the melted chocolate mixture to the egg mixture, whisking constantly.
- Sift in the all-purpose flour and salt, and gently fold the dry ingredients into the chocolate mixture until just combined.
- Gently fold in the chopped cherries.
- Pour the batter into the greased Dutch oven, spreading it evenly.
- If you’re using a Dutch oven outdoors, prepare a campfire or charcoal briquettes. Place some coals on the ground and set the Dutch oven over them. Place additional coals on the lid to create an even baking temperature.
- If you’re using a Dutch oven indoors, preheat your oven to 375°F (190°C) and place the covered Dutch oven in the oven.
- Bake the lava cake for about 12-15 minutes, or until the edges are set but the center is still slightly jiggly.
- Carefully remove the Dutch oven from the heat source or oven.
- Allow the lava cake to cool for a few minutes before serving.
- Dust the top of the lava cake with powdered sugar, if desired.
- Serve the Chocolate Cherry Lava Cake warm. You can also add a scoop of vanilla ice cream on top for extra indulgence.
This Chocolate Cherry Lava Cake is a decadent dessert that combines rich chocolate with bursts of sweet cherry flavor. The Dutch oven will help create a perfectly gooey center that’s the hallmark of a delicious lava cake. Enjoy this delightful treat whether you’re outdoors or indoors!
Blackberry Campfire Cobbler
The Blackberry Campfire Cobbler is a delicious Dutch oven dessert that is perfect for camping. Made with fresh blackberries and a sweet, biscuit-like topping, this dessert is sure to satisfy your sweet tooth.
Ingredients for the Blackberry Filling:
- 4 cups fresh blackberries (or frozen, thawed)
- 1 cup granulated sugar
- 1 tablespoon cornstarch
- 1 tablespoon lemon juice
- 1/2 teaspoon vanilla extract
Ingredients for the Cobbler Topping:
- 1 cup all-purpose flour
- 1/4 cup granulated sugar
- 1 1/2 teaspoons baking powder
- 1/4 teaspoon salt
- 1/2 cup milk
- 1/4 cup unsalted butter, melted
Instructions:
- Start by preparing your Dutch oven for campfire cooking. Make sure it’s clean and well-seasoned.
- In a mixing bowl, combine the blackberries, granulated sugar, cornstarch, lemon juice, and vanilla extract. Gently toss until the blackberries are coated with the sugar mixture.
- Pour the blackberry filling into the bottom of the Dutch oven.
- In another bowl, whisk together the flour, granulated sugar, baking powder, and salt for the cobbler topping.
- Pour in the milk and melted butter, and stir until just combined. The batter will be slightly lumpy.
- Carefully spoon dollops of the cobbler batter over the blackberry filling in the Dutch oven.
- Place the Dutch oven over your campfire, using a campfire cooking grate or tripod setup. If using coals, place some coals underneath the Dutch oven and also on the lid to create an even heat distribution.
- Cook the cobbler over the campfire for about 25-35 minutes, or until the cobbler topping is golden brown and the blackberry filling is bubbling.
- Check the cobbler occasionally and adjust the heat as needed to ensure even cooking.
- Once the cobbler is done, carefully remove the Dutch oven from the campfire and let it cool slightly before serving.
- Serve the Blackberry Campfire Cobbler warm. It can be enjoyed as is or with a scoop of vanilla ice cream if you have it available.
This Blackberry Campfire Cobbler is a wonderful dessert that combines the sweetness of ripe blackberries with a tender cobbler topping. Cooking it in a Dutch oven over a campfire adds a rustic and flavorful touch to the experience. Enjoy this delicious treat while savoring the great outdoors!
Cherry Chocolate Lava Cake
Indulge in the rich and decadent flavors of a cherry chocolate lava cake while enjoying the outdoors. This Dutch oven dessert recipe combines luscious dark chocolate with sweet cherries for a melt-in-your-mouth experience that will satisfy any sweet tooth.
Ingredients:
For the Cake:
- 1/2 cup unsalted butter
- 1 cup semi-sweet chocolate chips
- 1 1/4 cups powdered sugar
- 2 large eggs
- 3 large egg yolks
- 1 teaspoon vanilla extract
- 1/2 cup all-purpose flour
- 1/4 teaspoon salt
For the Cherry Filling:
- 1 cup cherries, pitted and chopped (fresh or frozen)
- 2 tablespoons granulated sugar
- 1 tablespoon lemon juice
Instructions:
- Start by preparing your Dutch oven. Grease the inside well to prevent sticking.
- In a microwave-safe bowl or using a double boiler, melt the butter and chocolate chips together, stirring until smooth. Allow the mixture to cool slightly.
- In a separate mixing bowl, whisk together the powdered sugar, eggs, egg yolks, and vanilla extract until well combined.
- Gradually add the melted chocolate mixture to the egg mixture, whisking constantly.
- Sift in the all-purpose flour and salt, and gently fold the dry ingredients into the chocolate mixture until just combined.
- In another bowl, toss together the chopped cherries, granulated sugar, and lemon juice to create the cherry filling.
- Pour half of the chocolate batter into the greased Dutch oven, spreading it evenly.
- Carefully spoon the cherry filling over the chocolate batter.
- Pour the remaining chocolate batter over the cherry filling, spreading it to cover.
- If you’re using a Dutch oven outdoors, prepare a campfire or charcoal briquettes. Place some coals on the ground and set the Dutch oven over them. Place additional coals on the lid to create an even baking temperature.
- If you’re using a Dutch oven indoors, preheat your oven to 375°F (190°C) and place the covered Dutch oven in the oven.
- Bake the lava cake for about 12-15 minutes, or until the edges are set but the center is still slightly jiggly.
- Carefully remove the Dutch oven from the heat source or oven.
- Allow the lava cake to cool for a few minutes before serving.
- Serve the Cherry Chocolate Lava Cake warm. You can also add a scoop of vanilla ice cream on top for extra indulgence.
This Cherry Chocolate Lava Cake is a decadent dessert that marries the flavors of rich chocolate and sweet cherries. The Dutch oven will help you achieve a perfectly gooey center that’s the hallmark of a delicious lava cake. Enjoy this delightful treat whether you’re outdoors or indoors!
Pecan Pralines
Pecan pralines are a delicious and indulgent treat that can be easily made in a Dutch oven while camping. These sweet confections are made by combining pecans, sugar, butter, and vanilla to create a rich caramelized candy.
Ingredients:
- 2 cups pecan halves
- 1 1/2 cups granulated sugar
- 1/2 cup packed light brown sugar
- 1/2 cup heavy cream
- 1/4 cup unsalted butter
- 1/4 teaspoon salt
- 1 teaspoon vanilla extract
Instructions:
- Start by preparing your Dutch oven. Place it over medium heat.
- Spread the pecan halves in a single layer on the bottom of the Dutch oven. Toast the pecans, stirring occasionally, until they’re fragrant and slightly darker in color. This should take about 5-7 minutes. Remove the toasted pecans and set them aside.
- In the same Dutch oven, combine the granulated sugar, brown sugar, heavy cream, unsalted butter, and salt. Stir the mixture until the sugars dissolve and the butter melts.
- Bring the mixture to a boil, then reduce the heat to medium-low. Continue to cook, stirring constantly, until the mixture reaches the soft-ball stage. This stage is around 235°F to 240°F (113°C to 116°C) on a candy thermometer.
- Once the mixture reaches the soft-ball stage, remove the Dutch oven from the heat.
- Quickly stir in the vanilla extract and toasted pecans. Keep stirring until the mixture thickens and becomes slightly creamy.
- Working quickly, drop spoonfuls of the praline mixture onto parchment paper or a silicone baking mat. You can use a spoon or an ice cream scoop.
- Let the pralines cool and set completely before serving.
- Once the pralines are set, you can store them in an airtight container at room temperature.
These Pecan Pralines are a delightful treat with a wonderful combination of sweet, nutty flavors and creamy texture. Making them in a Dutch oven allows for precise temperature control and even cooking. Enjoy these pralines as a sweet snack or a lovely gift for friends and family!
Marshmallow Cheesecake
Marshmallow Cheesecake is a delightful and creamy dessert that you can easily make in your Dutch oven while camping. This recipe combines the smooth texture of traditional cheesecake with the sweet and fluffy taste of marshmallows.
Ingredients for the Crust:
- 1 1/2 cups graham cracker crumbs
- 1/4 cup granulated sugar
- 1/3 cup unsalted butter, melted
Ingredients for the Filling:
- 24 oz (680g) cream cheese, softened
- 1 cup granulated sugar
- 3 large eggs
- 1 teaspoon vanilla extract
- 1 cup marshmallow creme (fluff)
Ingredients for the Topping:
- 1 cup marshmallow creme (fluff)
- 1/2 cup heavy cream
- 1 cup mini marshmallows
- Optional: Chocolate sauce and additional mini marshmallows for garnish
Instructions:
- Start by preparing your Dutch oven. Preheat your oven to 325°F (165°C) and grease the inside of the Dutch oven.
- In a bowl, combine the graham cracker crumbs, granulated sugar, and melted butter for the crust. Mix until the crumbs are moistened.
- Press the crumb mixture firmly into the bottom of the greased Dutch oven to create an even crust.
- In a large mixing bowl, beat the softened cream cheese and granulated sugar until smooth and creamy.
- Add the eggs one at a time, mixing well after each addition.
- Mix in the vanilla extract and marshmallow creme until well combined.
- Pour the cheesecake filling over the crust in the Dutch oven, spreading it evenly.
- Place the Dutch oven inside a larger roasting pan or baking dish. Add hot water to the roasting pan, creating a water bath for the cheesecake. The water level should come up about halfway on the sides of the Dutch oven.
- Carefully transfer the setup to the preheated oven and bake for about 50-60 minutes, or until the edges are set and the center is slightly jiggly.
- Turn off the oven and leave the Dutch oven in the oven with the door ajar for about 1 hour to allow the cheesecake to cool gradually.
- Once the cheesecake has cooled to room temperature, remove it from the oven and refrigerate it for at least 4 hours or overnight.
- For the topping, whisk together the marshmallow creme and heavy cream until well combined.
- Spread the marshmallow creme mixture over the top of the chilled cheesecake.
- Sprinkle mini marshmallows over the top of the marshmallow creme layer.
- If desired, use a kitchen torch to lightly toast the mini marshmallows for that classic toasted marshmallow flavor.
- Drizzle chocolate sauce over the top and garnish with additional mini marshmallows if desired.
- Slice and serve the Marshmallow Cheesecake from the Dutch oven.
This Marshmallow Cheesecake is a delightful dessert that combines the creamy richness of cheesecake with the sweet and fluffy goodness of marshmallows. Your Dutch oven will help create a perfectly baked cheesecake that’s sure to be a hit at any gathering. Enjoy!
Easy and Quick Dutch Oven Desserts
Get ready to satisfy your sweet tooth with these mouthwatering Dutch oven dessert recipes that are quick and easy to make. From gooey monkey bread to fudgy brownies, these treats are perfect for your next camping adventure.
Explore the full blog post for all the delicious recipe details!
Dutch Oven Monkey Bread
Make your camping mornings extra special with the deliciousness of Dutch Oven Monkey Bread. This sweet and gooey treat is made by baking bite-sized pieces of dough coated in cinnamon sugar in a Dutch oven over campfire coals.
As it bakes, the dough puffs up and turns golden brown, creating a mouthwatering aroma that will have everyone gathering around the campfire. Perfect for breakfast or dessert, this easy-to-make monkey bread is sure to be a hit with your fellow off grid adventurers.
So grab your Dutch oven and get ready to indulge in this irresistible treat!
Dutch Oven Dutch Baby
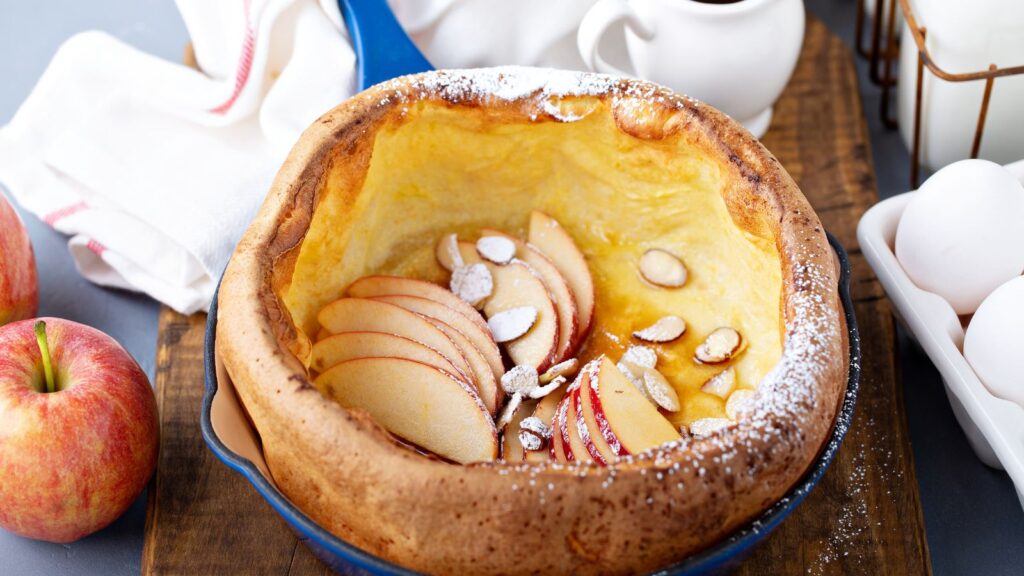
The Dutch Oven Dutch Baby is a delightful and easy dessert that you can make while camping. This fluffy pancake-like treat is cooked in a cast iron dutch oven, giving it a crispy golden crust.
It’s typically served with powdered sugar and lemon wedges for added flavor. The Dutch Oven Dutch Baby is perfect for breakfast or as a sweet snack throughout the day. With its simple ingredients and quick cooking time, it’s an excellent choice for off-grid living and outdoor adventures.
S’mores Cookie Cake
The S’mores Cookie Cake is a mouthwatering treat that combines the classic flavors of s’mores with a soft and chewy cookie. It’s the perfect dessert to make while camping, as it can be easily prepared in a Dutch oven over an open fire.
The recipe calls for graham cracker crumbs, chocolate chips, and mini marshmallows, which are all layered on top of a rich cookie dough base. As the cookie cake bakes in the Dutch oven, the ingredients melt together to create a gooey and indulgent dessert that will satisfy any sweet tooth.
Whether you’re enjoying it under the stars or by the campfire, this S’mores Cookie Cake is sure to be a crowd-pleaser on your next camping adventure.
Coconut Upside Down Pineapple Cake
The Coconut Upside Down Pineapple Cake is a delightful treat to enjoy while camping. This recipe combines the tropical flavors of coconut and pineapple for a delicious cake that will impress your fellow campers.
With its caramelized pineapple topping and moist coconut-infused cake, this dessert is sure to be a hit around the campfire. The best part? It’s easy to make! Just flip the cake onto a platter after baking, and you’ll have a beautiful presentation ready to serve.
So why not try adding some tropical flair to your camping trip with this Coconut Upside Down Pineapple Cake?.
Dutch Oven Brownies
Making brownies while camping has never been easier with this delicious Dutch Oven Brownies recipe. The rich chocolatey goodness of these brownies will have everyone asking for seconds.
Simply mix together the ingredients, pour into a greased Dutch oven, and let the magic happen over the campfire. In no time, you’ll be enjoying warm and fudgy brownies that are perfect for satisfying your sweet tooth while exploring the great outdoors.
Coconut Oil Popcorn
Coconut oil popcorn is a delicious and healthier alternative to traditional buttered popcorn. Made with just three simple ingredients – coconut oil, popcorn kernels, and salt – this snack is easy to make while camping.
The coconut oil adds a subtle tropical flavor to the popcorn, making it even more enjoyable. Plus, using coconut oil means you can skip the artificial flavors and preservatives found in microwave popcorn bags.
So grab your Dutch oven, heat up some coconut oil, add in the kernels, and sprinkle with salt for a tasty treat that will keep you coming back for more.
Tips and Tricks for Successful Dutch Oven Dessert Baking
Mastering the art of Dutch oven dessert baking requires essential supplies, precise temperature control, proper seasoning and cleaning techniques, careful ingredient selection, and tips for storage and transportation.
Essential supplies
To successfully bake delicious Dutch oven desserts while camping, there are a few essential supplies that you’ll need. First and foremost, you’ll need a sturdy and properly sized Dutch oven.
This will ensure even heat distribution and allow your desserts to cook properly. Additionally, make sure to have plenty of charcoal briquettes or campfire coals on hand for cooking over an open fire.
Other important supplies include aluminum foil for lining the Dutch oven, a long-handled spatula or tongs for handling hot coals, and oven mitts or heat-resistant gloves to protect your hands while removing the hot lid.
Temperature control
Controlling the temperature is crucial when baking desserts in a Dutch oven while camping. To ensure your treats turn out perfectly, it’s important to monitor and adjust the heat accordingly.
Too much heat can lead to burnt or overcooked desserts, while too little heat may result in undercooked or gooey treats. By arranging the coals strategically and adjusting their placement, you can control the temperature inside the Dutch oven.
This will help you achieve even cooking throughout and ensure that your delicious campfire desserts are cooked to perfection every time.
Proper seasoning and cleaning
To ensure successful Dutch oven dessert baking while camping, it is essential to properly season and clean your Dutch oven. Seasoning the pot helps create a nonstick surface that prevents your desserts from sticking and burning.
Before first use, wash the Dutch oven with warm water and mild soap. Then, apply a thin layer of vegetable oil or shortening to the inside and outside of the pot. Place it upside down on a rack in an oven preheated to 350°F (175°C) for about one hour.
Repeat this process periodically to maintain the seasoning. To clean your Dutch oven after each use, avoid using harsh abrasives or dishwashers as they can damage the seasoning. Instead, scrub gently with hot water and a nylon brush or sponge.
Dry thoroughly before storing in a cool, dry place until your next camping adventure.
Choosing the right ingredients
When it comes to choosing the right ingredients for your Dutch oven desserts, quality is key. Opt for fresh fruits and vegetables that are in season to ensure maximum flavor. Look for high-quality chocolate and cocoa powder for rich and decadent desserts.
Use real butter instead of margarine for a creamy texture and superior taste. Don’t forget to select the best quality flour, sugar, and spices to bring out the flavors in your recipes.
By using top-notch ingredients, you can elevate your camping desserts to new levels of deliciousness.
Storage and transportation tips
When you’re camping and using a Dutch oven to make delicious desserts, it’s important to know how to store and transport your equipment properly. Firstly, make sure your Dutch oven is completely cool before packing it away.
You can use a cloth or paper towel to wipe off any excess food or residue. Next, consider investing in a sturdy storage bag or container specifically designed for Dutch ovens. This will help protect your oven from scratches and dents during transportation.
Additionally, if you’re planning on cooking multiple dishes while camping, stack your Dutch ovens inside each other to save space and secure them with bungee cords or straps to prevent them from shifting around in your vehicle.
Conclusion
Indulge in the mouthwatering goodness of Dutch oven desserts on your camping adventures. These delicious recipes will satisfy your sweet tooth and impress your fellow campers. Whether you’re craving a warm cobbler or gooey chocolate cake, these easy-to-make treats are sure to please.
So grab your Dutch oven and get ready for a camping dessert experience like no other!
FAQs
1. Can I use a regular oven to make these Dutch oven dessert recipes?
No, these recipes are specifically designed for cooking in a Dutch oven over an open flame or hot coals while camping.
2. How long does it take to cook desserts in a Dutch oven while camping?
Cooking times will vary depending on the recipe and heat source, but most Dutch oven desserts take around 30 minutes to 1 hour to cook thoroughly.
3. Do I need any special ingredients or tools for these dessert recipes?
Most of the dessert recipes can be made with common pantry staples like flour, sugar, and spices. You will need a Dutch oven with a lid and some basic cooking utensils like tongs or mitts for handling the hot pot.
4. Are these desserts suitable for people with dietary restrictions?
Some of the dessert recipes can be easily modified to accommodate certain dietary restrictions, such as using gluten-free flour or dairy-free alternatives. However, it’s important to check each individual recipe for specific ingredient substitutions and adjustments.
