
")
Welcome to the ultimate guide on prepping food for canning, an essential skill for every prepper and survivalist! With a focus on off-grid living, this comprehensive resource will take you through everything from the importance of canned food in emergency situations to the best techniques and recipes for preserving your meals.
Key Takeaways
- Canning food is crucial for preppers and survivalists to ensure food security, reduce waste, extend shelf life, save costs long-term, prepare for emergencies.
- Proper tools including canning jars, lids and bands, pressure canners or water bath cannery sets are essential for successful food preservation.
- Choosing the best canned foods for survival involves selecting hearty and nutrient – rich options with a longer shelf life such as chicken or tuna fish cans packed in water/saltwater; soups/stews/chili mixes; fruits like peaches/pineapples; vegetables such as corn/green beans/carrots.
- This comprehensive guide provides invaluable tips on how to select and wash produce properly before filling jars carefully while using only high-quality ingredients. By following these guidelines today you’ll have peace of mind knowing that your family will be prepared during uncertain times thanks to your emergency food supply!
Why Canning Food Is Important For Preppers And Survivalists
Canning food is crucial for preppers and survivalists to ensure food security, reduce waste, extend shelf life, be cost-effective long-term, prepare for emergencies, and have the best canned foods on hand.
Ensuring Food Security
Ensuring food security is a top priority for preppers and survivalists, as having access to a steady supply of nutritious meals can make all the difference in times of crisis or unexpected emergencies.
Canning is an excellent method to achieve this goal, allowing off-grid enthusiasts to create their own self-sufficient food source while minimizing reliance on external supplies.
For example, imagine living off-grid during an extended power outage where refrigeration becomes impossible – with canned goods on hand such as fruits, vegetables, and protein-packed stews or beans, you will be able to maintain essential nutrients intake for yourself and your family until normalcy returns.
This level of preparedness not only ensures food security but also fosters independence from commercial grocery stores which may face shortages or price hikes in emergency situations.
Extended Shelf Life
Canning food for survivalists and preppers is essential due to the extended shelf life it provides. Food that can be preserved through this method can last for years, providing a reliable source of sustenance during emergencies and off-grid living situations.
With proper sanitation practices, canned foods remain fresh and are free from spoilage or contamination. For example, canned fruits like peaches and pineapples that are packed in syrup have an average shelf life of two to five years.
The benefits of extending the shelf life of food through canning also include reducing waste by utilizing excess produce before it spoils while saving money by buying items in bulk when they’re on sale or plentiful in season.
Additionally, prepping food for canning allows for more variety within your long-term storage supply while ensuring you don’t run out of essentials during difficult times.
Reduced Waste
Canning food is not only a useful way to stock up on emergency supplies, but it’s also an excellent way to reduce waste. When produce is in season or when you buy in bulk, there’s always the fear of it going bad before you can consume it all.
By canning fruits and vegetables, you’ll be able to preserve them for future use rather than letting them go to waste. This is especially true for preppers living off-grid who don’t have easy access to grocery stores.
Canned goods also allow for precise portion control, ensuring that you only open what you need and avoid throwing away spoiled leftovers. Plus, by reusing jars instead of disposable containers, you’re doing your part in reducing plastic waste as well.
Cost-Effective
Canning food is a cost-effective way to stockpile nutritious, shelf-stable meals for preppers and survivalists. By preserving seasonal produce at its peak freshness, you can avoid buying expensive out-of-season fruits and veggies.
In addition, canned food has a much longer shelf life than fresh food, which means less waste and more savings in the long run. With proper equipment and techniques, you can create your own healthy meal-in-a-jar recipes using ingredients sourced from local farms or grocery stores at a fraction of the cost of store-bought emergency rations.
Preparing For Emergencies
One of the primary reasons why preppers and survivalists choose to can food is to prepare for emergencies. Whether it’s a natural disaster, power outage, or unexpected personal crisis, having a stockpile of shelf-stable food can provide peace of mind and ensure that you and your family are well-fed during times of hardship.
Canned foods are easy to store and transport, making them an ideal choice for emergency preparedness kits. With proper planning and preparation, canned foods can help sustain you through difficult times when fresh food may not be available.
Best Canned Foods For Survival
When prepping food for canning, it is important to choose the best canned foods for survival. These include hearty and nutrient-rich options that can provide sustenance in times of emergency.
Some great choices are canned meats like tuna and chicken, which are high in protein and shelf-stable. Canned soups, stews, and chili offer a filling meal-in-a-jar option, while fruits like peaches and pineapples provide a sweet treat as well as vitamins.
Vegetables such as corn, green beans, and carrots also make excellent choices for preppers who want to stockpile nutritious options for their family.
Essential Tools And Equipment For Prepping Food For Canning
To ensure successful food canning, it’s crucial to have the right tools and equipment on hand, including canning jars, lids and bands, pressure canners, water bath canners, funnels, jar lifters, bubble remover tools, and thermometers – read on for more details!
Canning Jars
Choosing the right canning jars is essential to ensure the success of your food preservation efforts. Mason jars are a popular choice as they come in various sizes and can be reused again and again.
These jars are made from tempered glass, which can withstand high temperatures during processing without breaking. It’s also important to note that not all jars are suitable for pressure canning, so make sure to check the manufacturer’s recommendations before use.
Another thing to consider is whether you should choose regular or wide-mouthed jars depending on the type of food you plan to preserve.
Canning Lids And Bands
Canning lids and bands are essential tools for prepping food for canning. The lid creates an air-tight seal on the jar, while the band holds it in place during processing.
It’s important to use new lids each time you can, as used ones won’t create a reliable seal. Lids come in two types: regular and wide-mouth. Regular lids fit standard jars, while wide-mouth lids are for jars with wider openings.
Bands are reusable but should be inspected before each use to ensure they’re not rusted or bent.
Properly sealing your canned goods is critical when it comes to ensuring their long-term shelf life. Without a proper seal, bacteria can grow and spoil your food over time, rendering it dangerous to eat during emergencies or disasters.
Pressure Canner
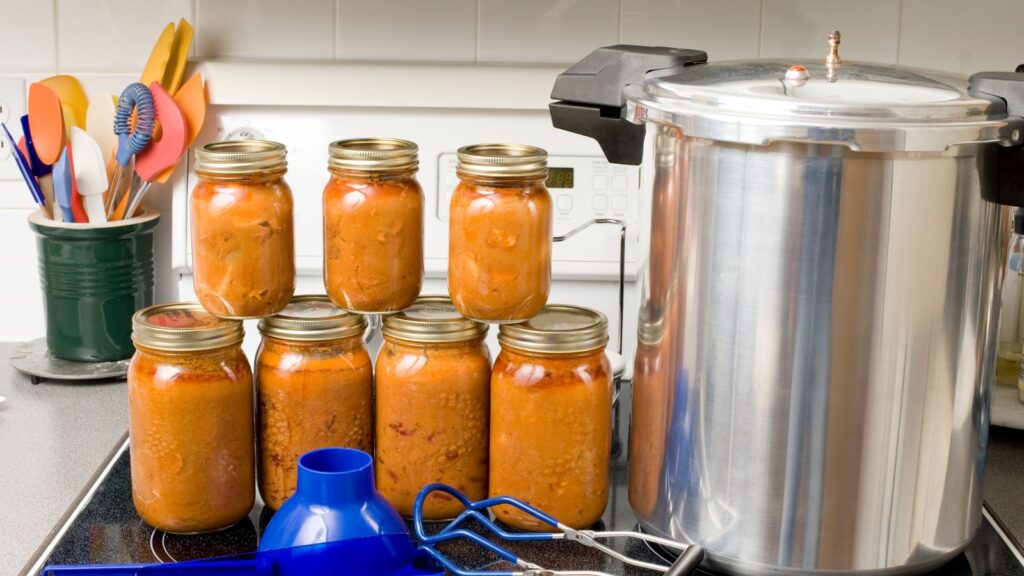
A pressure canner is an essential piece of equipment for preppers and survivalists looking to create a long-term supply of canned food. This type of canner uses steam and pressure to reach higher temperatures, making it suitable for preserving low-acid foods like meat, seafood, beans, and lentils.
When choosing a pressure canner, look for one with adjustable weights or gauges that allow you to monitor the level of pressure inside the pot. Make sure also to follow proper instructions when using this equipment as it involves high heat and boiling liquids.
Water Bath Canner
A water bath canner is a kitchen tool used to preserve high-acid foods, including fruits and pickled vegetables. It is an inexpensive and easy-to-use alternative to pressure canning for beginners in the prepping community.
The process involves boiling jars of prepared food for a set amount of time to kill bacteria and seal the jars tight. Water bath canners typically come with a rack that holds jars at least one inch apart so they don’t touch each other or the sides of the pot during processing.
This ensures even heat distribution and reduces the risk of glass breakage.
Funnel
A funnel is one of the essential tools you will need when prepping food for canning. It helps to pour hot liquids and solids into jars without making a mess or wasting any food.
When using a funnel, make sure it is clean and sterilized before each use. Place it over the mouth of the jar and carefully fill with prepared produce, leaving enough headspace as directed by your recipe.
Jar Lifter
A jar lifter is an essential tool for any prepper or survivalist who wants to safely can their food. It allows you to lift hot jars out of boiling water or a pressure canner without risking burns.
The jar lifter has specially designed arms that securely grip the jars, making it easy to handle them with precision and control.
Proper use of a jar lifter is critical when canning food because the heat from the boiling water makes handling glass jars difficult and unsafe. Using tongs or other makeshift tools may seem like an option, but they don’t provide adequate stability and could lead to dropped jars and broken glass.
Bubble Remover Tool
The bubble remover tool is a simple yet invaluable tool for any prepper or survivalist looking to prep food for canning. This tool, also known as a debubbler or bubble popper, allows you to easily remove air bubbles from your jars before processing them.
By removing the air bubbles, you are ensuring that the food in the jar is evenly distributed and packed tightly, which helps prevent spoilage and bacteria growth. This can be especially important for low-acid foods like meats and vegetables that require pressure canning.
Without this tool, it can be difficult to get all of the air out of your jars by simply tapping on them with a spoon or spatula.
Thermometer
A thermometer is an essential tool to ensure that your canned food has been processed at the correct temperature. When prepping food for canning, it’s important to monitor the temperature of your pressure or water bath canner with a reliable thermometer.
For example, when processing meats or seafood, it’s crucial to check their internal temperatures before filling them into jars. Using a thermometer guarantees that they have reached minimum safe cooking temperatures before being canned.
To summarize, using a good quality thermometer is vital for ensuring safe and effective food preservation practices.
Key Steps To Prepping Food For Canning
Select and wash produce, cut it into appropriate sizes, heat and fill jars with the produce, process and cool the filled jars before labeling them properly for storage as per prepper cannings considerations; these key steps are necessary to effectively prep food for canning.
Selecting And Washing Produce
When it comes to selecting and washing produce for canning, there are a few important considerations to keep in mind. It’s crucial to choose only the freshest, highest quality fruits and vegetables, as their flavor and nutritional value will be preserved during the canning process.
Before preparing your produce for canning, make sure to thoroughly wash everything with cold water. This helps remove any dirt or debris that may be present on the surface of the food.
Avoid using soap or other cleaning agents, as these can leave behind harmful residues that could impact the safety of your canned goods. Instead, opt for a gentle scrub with a soft-bristled brush if necessary.
Cutting And Preparing Produce
Once you have selected your produce, it is time to prepare them for canning. Wash your fruits and vegetables thoroughly with water and peel or trim off any parts that are not suitable for consumption.
For example, if you’re prepping tomatoes, slice them into quarters or halves depending on their size. For green beans or carrots, chop them into uniform pieces about 1-2 inches long.
It’s important to note that some foods require different methods of preparation before being canned. It’s advised to do research before starting food prep on a specific type of food as well as sterilizing all equipment properly before use.
Heating And Filling Jars
Once you have washed and prepared your produce, it’s time to start filling jars. Before doing so, make sure to heat the jars first to prevent breakage. You can place them in a water bath or preheat them in the oven at 225°F for 10 minutes.
When filling the jars, remember not to overfill them as this can cause the lids to fail during processing. Leave some headspace according to the recipe instructions. Use a funnel to pour hot liquid directly into each jar and remove any air bubbles with a bubble remover tool or knife before sealing tightly with lids and bands.
Properly heating and filling jars is essential in safe food preservation through canning.
Processing And Cooling Jars
Once your jars are filled with food and properly sealed, it’s time to process them. This involves placing the jars in a canner filled with water and heating them according to the recipe’s instructions.
After processing, the jars must be cooled slowly to prevent breakage. This is typically done by removing them from the canner and placing them on a towel or rack at room temperature for several hours.
Labeling And Storing Jars
After processing and cooling your jars, you will want to label them correctly before storing. Proper labeling includes the name of the food, the date it was canned, and any other identifying details like batch number or recipe source.
You can easily create labels for your jars using a permanent marker or printable labels.
When storing your jars, find a place that is cool, dry, and dark. Direct sunlight can cause discoloration in foods as well as decrease shelf life. The ideal temperature range for storage is between 50-70°F (10-21°C).
Remember to rotate your stock regularly by using older cans first before their expiry dates and replenishing with fresh ones afterward.
Prepper Canning Considerations
It’s important for preppers to take into account various factors when it comes to canning their own food for long-term storage. One key consideration is the type of produce or ingredients being canned, as some foods may require different processing times or techniques in order to ensure safety and prevent spoilage.
Another factor to keep in mind is the altitude at which you are canning, as this can affect pressure and temperature requirements. Additionally, preppers should be mindful of sanitation practices when handling food and equipment, such as washing hands thoroughly before starting and using new lids each time to prevent contamination.
Canning And Food Preservation Techniques
Learn about the different canning and food preservation techniques, including water bath canning, pressure canning, and pickling. Discover how these methods extend shelf life while maintaining nutritional value in your canned foods.
Low-Acid Foods And Pressure Canning
Low-acid foods such as meats, fish, and vegetables require special treatment when it comes to canning. This is because they contain bacteria that can cause food poisoning if not properly processed.
The best way to preserve low-acid foods is through pressure canning, which involves using a specialized pressure canner that reaches high temperatures to kill off any harmful bacteria.
One important fact to note is that the processing time for different types of low-acid foods will vary depending on factors like altitude and size of the jars used. It’s crucial to follow tested recipes from reliable sources and adjust the processing times accordingly.
Water Bath Canning
Water bath canning is a preservation method that involves submerging jars of food in boiling water to destroy bacteria and prevent spoilage. It is an ideal technique for high-acid foods such as fruits, jams, pickles, and tomatoes.
Water bath canning is a great way for preppers and survivalists to stockpile food because it requires only basic equipment like a pot with a lid, jar lifter, funnel, and thermometer.
The process involves preparing the produce by washing them thoroughly before packing them into sterilized jars. Then the jars are placed in the water bath canner filled with enough water to cover the lids by at least one inch.
Once the temperature hits 212°F (100°C), you should start timing based on your recipe’s processing time duration.
By following proper safety precautions when storing canned food like checking for seal quality regularly this will help prolong its shelf life since unwanted air would be prevented from entering any damaged cans or unsealed ones making it unsupportive for bacterial growth thus minimising risk of illness due to spoilt foods during emergencies This article offers tips on how best to apply essential methods like water bath canning suitable for high- acidity items as well as other techniques that require more pricey equipment where applicable including low acid products which mandate pressure-canning rather than relying solely on buying expensive commercially preserved foods that may not last long-on shelves especially in dire survival situations.
Pickling
Pickling is a fantastic way to preserve vegetables, fruits, and other food items for long periods of time. This technique involves preserving the produce in a solution of vinegar, salt, and spices, creating a tangy and flavorful snack that can be enjoyed on its own or added to meals as an accompaniment.
With pickling being such an easy process, many preppers and survivalists choose this method to stock up on nutritious vegetables like cucumbers and carrots. Pickled foods are also incredibly versatile; they can be used as toppings for sandwiches or burgers or served as side dishes alongside meats.
Meal-in-a-Jar Canning Recipes
Learn how to create nutritious and easy-to-prepare meal-in-a-jar recipes, including vegetarian and meat-based options, soups, sauces, beans, fruits and jams – perfect for prepping your emergency food supply.
Vegetarian And Meat-Based Options
For those interested in off-grid living, having a supply of vegetarian and meat-based canned foods is essential. With a variety of options available, such as lentils, beans, and veggies for vegetarians and meats like chicken, beef stew or chili con carne for carnivores- there’s something to suit every taste bud.
Not only are these meals easy to prepare during an emergency situation but they also provide essential nutrients required by the body to stay healthy. Canning your own food allows you to control what goes into it, so if you have dietary restrictions or allergies, you can ensure that all ingredients meet your requirements.
In addition to having plenty of meat-based options like stews or even canned fish such as salmon at hand; stocking up on fruits and vegetables will give you the necessary vitamins needed for optimal health during stressful times.
Soups, Sauces, And Beans
Soups, sauces, and beans are all great options for canning as they are both versatile and filling. Soups can be made with a variety of ingredients including meats, vegetables, and grains, making them a nutritious meal in a jar.
Tomato-based sauces like marinara or salsa are also popular choices for preppers who want to add some flavor to their meals.
It’s important to follow proper recipes and guidelines when preparing these items for canning. It’s recommended that soups and sauces be pressure canned due to the low acidity levels of many ingredients used.
Beans can either be pressure canned or water bath canned depending on the specific type being preserved.
Fruits And Jams
Canning fruits and jams is a great way for preppers and survivalists to enjoy the taste of fresh produce all year round. Fruits like peaches, apples, and pears can be canned in light syrup or juice to preserve their natural flavors without adding extra sugar.
Jams are also a popular choice for canning because they require minimal equipment, few ingredients, and can be made with almost any fruit. They are perfect for spreading on toast or biscuits and can make a quick snack or breakfast when you’re on the go.
By preserving fruits and making homemade jams through canning techniques, preppers and survivalists ensure that they have access to healthy snacks even during an emergency.
Tips And Tricks For Successful Food Canning
Learn the key tips and tricks for successful food canning, including following proper recipes, using high-quality ingredients, adjusting for altitude, and more to ensure your emergency supply of canned food stays fresh and safe.
Following Proper Canning Recipes
One of the most crucial elements to successful food canning is following proper recipes. It’s important to rely on tested and approved recipes, as they have been formulated to ensure the safety and quality of the canned product.
Deviating from a recipe’s instructions could result in unsafe or spoiled food, which not only wastes money but also puts your health at risk.
The website for the National Center for Home Food Preservation offers many trusted recipes and guidelines for safe home canning practices. Following these recommended procedures will help you produce delicious preserved foods that are both nourishing and safe to eat.
Using Only High-Quality Ingredients
One crucial aspect of successfully prepping food for canning is to use only high-quality ingredients. This means choosing fresh produce that is in season and free of any bruising or damage.
It also means using high-quality meats and seafood that are free from contaminants and have been properly stored.
Moreover, choosing high-quality ingredients will help prevent spoilage and contamination during the canning process. Contaminants such as bacteria or mold can cause serious illness when ingested, so it’s important to take every precaution when handling food for canning.
Ensuring Proper Acidity Levels
It’s crucial to ensure proper acidity levels when prepping food for canning to prevent the growth of harmful bacteria such as botulism. The acidity level of food is determined by its pH, and low-acid foods require a pressure canner to safely preserve them.
High-acid foods like fruits, pickles, and tomatoes can be safely canned using a water bath canner with added acid such as lemon juice or vinegar to reach the required pH level.
It’s important to follow tested recipes that specify the appropriate processing time and method for each type of food being canned, and not modify them in any way that could compromise safety.
Not Overfilling Jars
It’s important not to overfill canning jars when prepping food for canning. Overfilled jars may lead to seal failure during the canning process, which could result in spoilage and waste of your hard-earned resources.
As a general rule, leave a half-inch headspace at the top of each jar before processing. This extra space allows for proper heat distribution during processing and creates room for expansion as the contents cool down.
Additionally, if there is too much food in the jar, it may block proper airflow inside; this could prevent air from exiting as canned goods are being heated or cause an unbalanced temperature inside the vessel that increases risks of uneven cooking or preservation problems.
Adjusting For Altitude
Altitude can have a significant impact on the success of your canned food. At higher elevations, the boiling point of water is lower than at sea level, which means that it may take longer for your jars to process properly.
To adjust for altitude when prepping food for canning, follow USDA guidelines and make sure you use a pressure canner when appropriate. For example, if you’re going to be preserving low-acid foods like meats or vegetables, they should be processed in a pressure canner rather than a water bath.
It’s also important to note that adjusting for altitude isn’t just about extending processing times – it also involves adjusting other factors such as recipe ingredients and jar size.
Importance Of Canned Foods In Emergency Kits
Canned foods are a crucial component of any emergency survival kit, especially for those living off the grid. In times of crisis or natural disasters, access to fresh food can be limited or completely cut off.
What makes canned foods ideal for emergency situations is their extended shelf life. Most canned goods can last up to two years, which means you can stockpile them well in advance of any potential events.
It’s important to choose nutrient-rich options when selecting canned goods for emergencies. Vegetables like green beans, carrots, and peas provide essential vitamins and minerals while also helping supplement meals made with dehydrated or freeze-dried ingredients.
Canned fruits like peaches and pears provide much-needed sweetness during stressful times while also serving as excellent snacks on the go.
Stockpiling Food
Stockpiling food is crucial for anyone interested in off grid living or prepping for emergencies. The article emphasizes that stockpiling canned food is the most practical choice due to its long shelf life and availability.
It’s important to have a variety of non-perishable items, including beans, lentils, fruits, vegetables, and meats that can be stored at room temperature. The article stresses the importance of rotating through your supplies and ensuring they are stored properly to avoid spoilage or contamination.
A helpful tip offered is keeping track of expiration dates with a calendar and storing new cans behind old ones to ensure freshness.
Conclusion
In times of crisis, having a stockpile of food could make all the difference in the world. This comprehensive guide to prepping food for canning is a must-have resource for preppers and survivalists alike.
With tips on selecting and washing produce, filling jars properly, and using only high-quality ingredients, you’ll be able to create a long-term supply of nutritious meals that will last for years.
From fruits and veggies to soups and sauces, this article covers everything you need to know about canning food at home.
FAQs:
1. What types of food are best for canning?
Fruits, vegetables, and meats are all popular choices for canning. It’s important to choose high-quality produce that is fully ripe and in good condition to ensure the best taste and texture after canning.
2. What equipment do I need for successful food canning?
Basic equipment needed for successful food canning includes a pressure cooker or water bath canner, jars with lids and bands, a jar lifter, funnel, lid wand, and a bubble remover tool. Additional tools may be necessary depending on the specific recipe being used.
3. How long does canned food last?
When properly sealed and stored in a cool, dry place away from direct sunlight or extreme temperatures, canned foods typically have a shelf life of one to five years depending on the type of food being preserved.
4. Is it safe to eat home-canned foods?
Home-canned foods are generally safe to eat if proper techniques were followed during processing and storing them correctly afterwards (with particular attention paid to cleanliness when handling the jars). However,it’s important always inspect each jar before opening & consuming- if there’s any indication that contents have gone bad or spoilt like releasing gas or presence of molds / yeasts then please discard immediately as they could pose health risks if consumed.”
